Occlusion System
The Unity integration provides an occlusion system that allows you to simulate the occlusion of audio sources by game objects in the scene. The system is based on raycasting and can be used to simulate the occlusion of audio sources by walls, objects, or other occluders in the scene.
The system consists of two main components: an Atmoky Occluder component that
tags game objects as occluders and an Atmoky Occlusion Probe Group component
that controls the occlusion of audio sources.
The following steps will guide you through the process of setting up the occlusion system in your Unity project.
Add Occlusion parameter to your FMOD event
- Open your FMOD project, open the event you want to add occlusion to, and add a
parameter called
occlusion. - Set the type to
User: Continuousand set the range to0.0and1.0. - Set the Parameter scope to
Local
Connect the Occlusion parameter to the atmoky Spatializer
- In the same event, select the atmoky Spatializer instance and right-click on
the
occlusionparameter. - Select
Add Automationand connect theocclusionparameter via theAdd Curvebutton - Adjust the curve to your liking. A value of
0.0means no occlusion, a value of1.0means full occlusion. As a start draw a linear curve.
Save and build the FMOD project
Tag occluders
- Open your Unity project
- Add the
Atmoky Occluderscript to every game object that should occlude audio sources and set theirOcclusionvalue, which defines how strongly this object occludes audio sources. - (Optional but recommended) Choose an occlusion layer for the occluder. Working with occlusion layers can massively reduce the number of objects that need to be considered during raycasting, which improves performance.
Add occlusion probe group
- Add the
Atmoky Occlusion Probe Groupscript to the FMOD Studio Event Emitter with your event. - Select the
occlusionparameter you created previously in theParameter Namefield. - Add or delete occlusion probes in the inspector
- Adjust the position of the occlusion probe in the Scene View by selecting the occlusion probe tool and dragging the handles.
- (Optional) Turn on non-allocating raycasting for better performance. If turned on, be sure to adjust the maximum number of hits that the raycasting command should consider to your usecase. Less means better performance, but can potentially lead to some occluders not being considered if configured too low.
- (Optional) Adjust the occlusion layers considered for raycasting. Per default, all occlusion layers are considered. You can configure the raycasting to exclude certain layers, which can drastically improve performance when there are many objects in the scene.
- (Optional) Set the
Reference Objectto a different object than the Audio Listener. TheReference Objectis the object that defines the position of the target of the raycasts, which defaults to the currently activeAudio Listener. You might want to change that to theMain Cameraor any other object that should be used as the target of the raycasts.
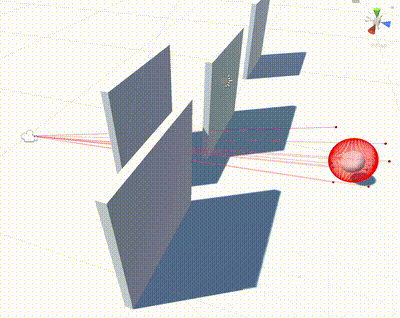
For every Occlusion Probe, a ray is cast from the probe to the
Reference Object, which defaults to the active Audio Listener. All occluders
that are hit by this ray add to the occlusion value of the probe (which is also
displayed for every probe in the inspector). Per default, the final occlusion
value of the source is then calculated by averaging the occlusion values of all
probes. You can change this behaviour by changing the Occlusion Sensitivity
parameter: setting it to min will take the minimum occlusion value of all
probes, setting in to mean will take the mean occlusion value of all probes, and
setting it to max will take the maximum occlusion value of all probes. All other
values will interpolate between the min, mean, and max. This way you can adjust
how rapidly the occlusion value changes when one or more probes are occluded and
thus implement different occlusion behaviours.
When the game object with the ProbeGroup component is selected, all rays are visualized in the Scene View when in play mode. The color of the rays represents the occlusion value of the probe: green means no occlusion, red means full occlusion.
In Edit-Mode, all computations use the SceneView camera instead of the
Reference Object per default. This way you can adjust the occlusion probes
without having to enter play mode. You can turn off this behaviour by
unchecking Use Editor Camera in Editor in the Atmoky Occlusion Probe Group component. The Scene View camera position in Unity is updated quite
sparsely, so occlusion values might not be updated as frequently as
expected.